New LibreQoS Setup Tool
• Herbert WolversonNew Setup Tool
The old LibreQoS setup tool was showing its age. In particular:
- It still created a Python configuration suitable for version 1.4 - which was then parsed into the new 1.5 format.
- The old tool didn’t look anything like typical Ubuntu/Debian setup tools.
- One directional navigation isn’t great for a complicated configuration.
- It wouldn’t offer any help once you’d run it once!
nlnet funded the creation of a better setup tool!
Visuals
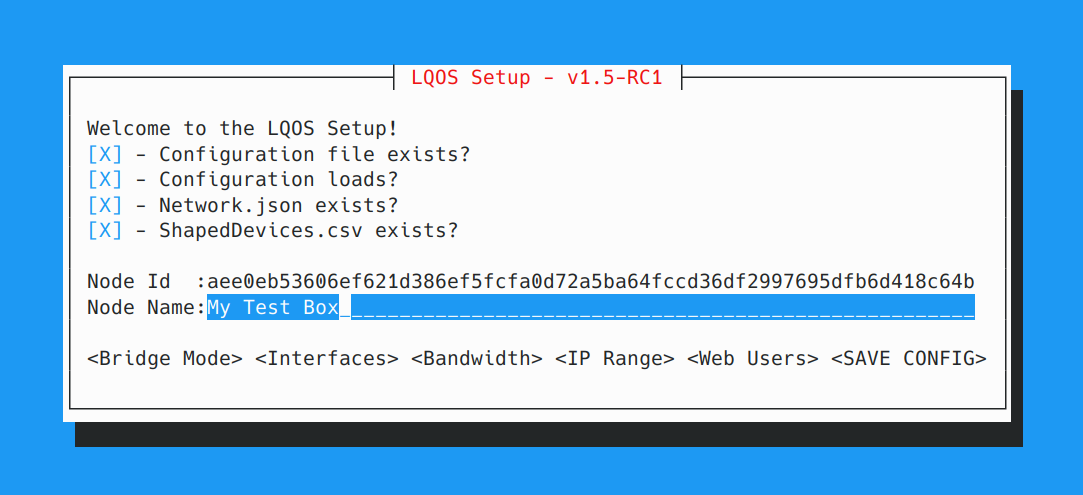
We really wanted to look like other Ubuntu/Debian setup systems. Consistency is important, and most of the infrastructure uses a very “Borland Turbo Vision” style - the mouse works, the text UI looks good on most devices, and scales to your terminal size. So we decided to use cursive - which fits all of these requirements.
The look and feel fits right in:
Functionality
There’s a few handy features:
The setup tool will tell you up-front if none of your network cards are going to work with LibreQoS.
This was a surprisingly necessary feature. We get questions every day in our chat about different cards, and why they don’t work. If none meet the criteria (XDP support, >2 queues) — the setup tool will bail out.
Configure the minimum, and get the web interface up
This was a driving goal. We offer configuration sections for what you must get up and running - and have supported the entire configuration in the web interface (and you can - of course - still edit the /etc/lqos.conf file yourself!)
Development Strategy
You can find the source code on GitHub.
We wanted to leverage existing functionality but — for obvious reasons — we couldn’t rely on lqosd being available to help (since we’re setting it up!). So we started with a Cargo.toml that pulls in the independent parts of LibreQoS configuration - but otherwise runs independently.
[package]
name = "lqos_setup"
version = "0.1.0"
edition = "2024"
license = "GPL-2.0-only"

[dependencies]
cursive = "0.21.1"
lqos_config = { path = "../lqos_config" }
nix.workspace = true
anyhow.workspace = true
once_cell = { workspace = true}
ip_network = { workspace = true }
Validation Code
We copied some of the validation code from lqosd’s sanity checking system. In the future, we might break these into a separate crate - but we needed to get this tool out quickly. For example, we get network card lists from nix:
pub fn get_interfaces() -> anyhow::Result<Vec<String>> {
    let interfaces = nix::ifaddrs::getifaddrs()?
    .filter(|iface| check_queues(&iface.interface_name).is_ok())
    .map(|iface| iface.interface_name)
        .collect::<Vec<_>>();
    Ok(interfaces)
}
And then we validate the number of queues by using the exact same mechanism as lqosd (in both C and Rust):
fn check_queues(interface: &str) -> anyhow::Result<()> {
    let path = format!("/sys/class/net/{interface}/queues/");
    let sys_path = Path::new(&path);
    if !sys_path.exists() {
        return Err(anyhow::anyhow!(
            "/sys/class/net/{interface}/queues/ does not exist. Does this card only support one queue (not supported)?"
        ));
    }

    let mut counts = (0, 0);
    let paths = std::fs::read_dir(sys_path)?;
    for path in paths {
        if let Ok(path) = &path {
            if path.path().is_dir() {
                if let Some(filename) = path.path().file_name() {
                    if let Some(filename) = filename.to_str() {
                        if filename.starts_with("rx-") {
                            counts.0 += 1;
                        } else if filename.starts_with("tx-") {
                            counts.1 += 1;
                        }
                    }
                }
            }
        }
    }

    if counts.0 == 0 || counts.1 == 0 {
        return Err(anyhow::anyhow!(
            "Interface {} does not have both RX and TX queues.",
            interface
        ));
    }
    if counts.0 == 1 || counts.1 == 1 {
        return Err(anyhow::anyhow!(
            "Interface {} only has one RX or TX queue. This is not supported.",
            interface
        ));
    }

    Ok(())
}
Structure
We follow a pretty predictable pattern:
- Initialization:
- We check if
/etc/lqos.confexists. If it does, we load it and show the current configuration. If it doesn’t, we create a default configuration. - We check that
network.jsonexists. - We check that
ShapedDevices.csvexists.
- We check if
- Top-level menu:
- We display the current status.
- We offer buttons for changing bridge mode, setting up interfaces, and setting maximum queue speeds.
- Interfaces:
- We display the current configuration and offer a UI to make changes.
- Save:
- If there’s a current configuration, we back it up.
- We save the configuration to
/etc/lqos.confandnetwork.json. - We offer to restart
lqosdif it is running.
Because cursive uses a stack-based setup, the top-level is always the first item. Then we push additional menus onto the stack as needed, and pop them off when the user is done. Because we’re only ever maintaining a single configuration, we share it as a global variable. Global variables are hard to avoid for this pattern!
Almost all the remaining code is Cursive user-interface definition. For example:
use cursive::{
    view::{Nameable, Resizable},
    views::{Button, Dialog, EditView, LinearLayout, SelectView, TextView},
    Cursive,
};
use ip_network::IpNetwork;
use crate::config_builder::CURRENT_CONFIG;

/// Shows and manages the list of allowed IP ranges.
pub fn ranges(s: &mut Cursive) {
    let initial_ranges = {
        let config = CURRENT_CONFIG.lock().unwrap();
        config.allow_subnets.clone()
    };

    let select_view = SelectView::<String>::new()
        .with_all(initial_ranges.iter().map(|range| (range.clone(), range.clone())))
        .on_submit(|_s, range: &str| {
            let mut config = CURRENT_CONFIG.lock().unwrap();
            config.allow_subnets.push(range.parse().unwrap());
        })
        .with_name("ip_ranges")
        .fixed_width(30);

    let layout = LinearLayout::horizontal()
        .child(LinearLayout::vertical()
            .child(TextView::new("Allowed IP Ranges:"))
            .child(select_view)
            .child(Button::new("Remove Selected", |s| {
                    s.call_on_name("ip_ranges", |view: &mut SelectView<String>| {
                        if let Some(selected) = view.selected_id() {
                            let mut config = CURRENT_CONFIG.lock().unwrap();
                            config.allow_subnets.remove(selected);
                            view.remove_item(selected);
                        }
                    });
                })
            )
        )
        .child(TextView::new(" ")) // 1-character spacer between columns
        .child(LinearLayout::vertical()
            .child(TextView::new("Add New Range:"))
            .child(
                EditView::new()
                    .on_submit(|s, content| {
                        let parsed = content.parse::<IpNetwork>();
                        if parsed.is_ok() {
                            let range = content.to_string();
                            let mut config = CURRENT_CONFIG.lock().unwrap();
                            config.allow_subnets.push(range);
                            s.call_on_name("ip_ranges", |view: &mut SelectView<String>| {
                                view.add_item(content.to_string(), content.to_string());
                            });
                        } else {
                            s.add_layer(Dialog::info("Invalid IP range format. Use CIDR notation, e.g., 192.168.0.0/16"));
                        }
                    })
                    .fixed_width(20)
            )
            .child(TextView::new("Press Enter to add the range"))
        );

        s.add_layer(
            Dialog::around(layout)
                .title("Allowed IP Ranges")
                .button("OK", |s| { s.pop_layer(); })
                .full_screen()
        );
}
Conclusion
The new tool is much easier to use than the previous one. It looks like a modern Ubuntu/Debian setup tool, and it provides a much better user experience. Development was relatively straightforward, and we were able to reuse a lot of existing code from LibreQoS.
Thanks to NLNet!
![]()